Manage Users
Login as an admin user
Navigate to the main admin page by selecting the “gear” symbol with the green dot located in the upper sight corner of the mail screen
This will take you to app.onebuttonconnect.com/admin
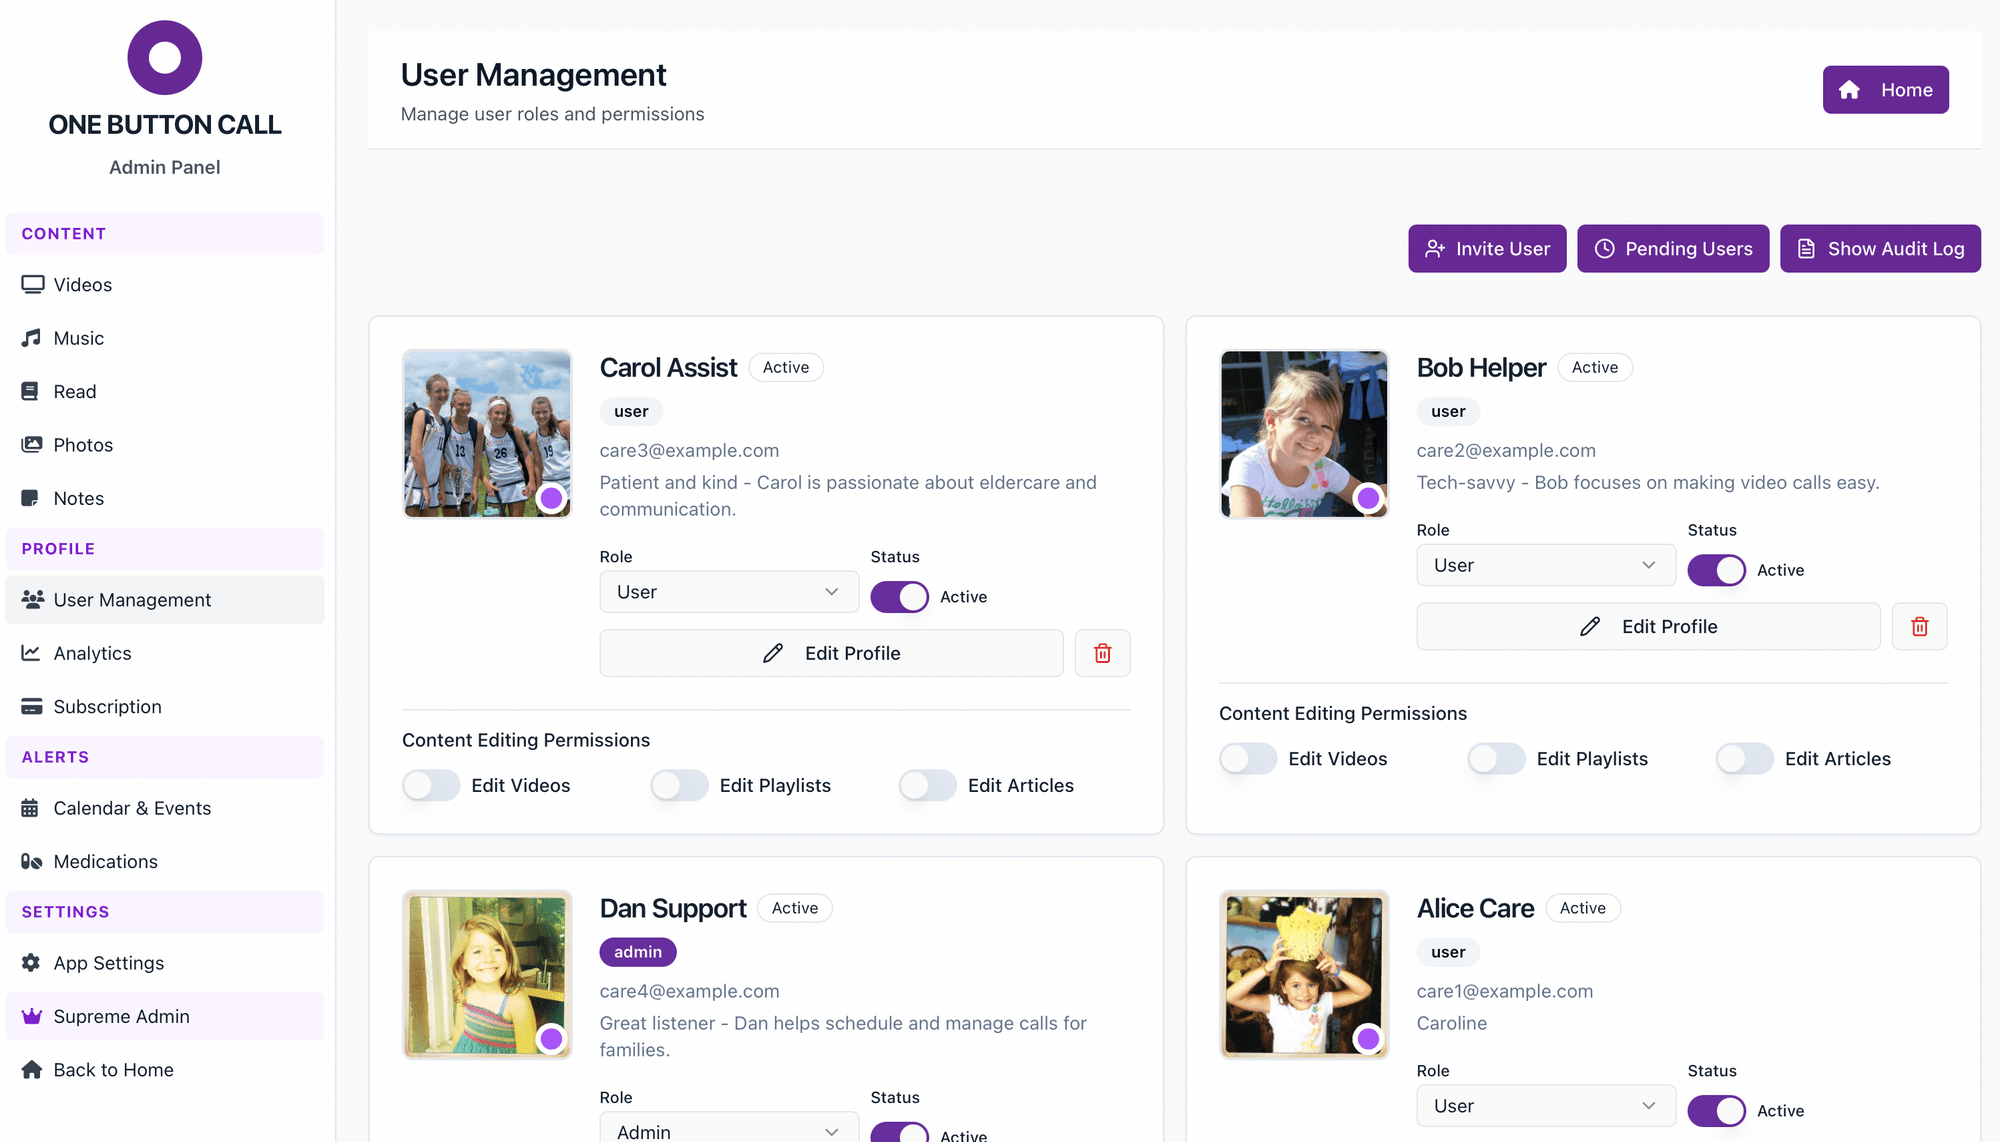
Select the “User Management” tab in the left rail.
To add a user, select "Invite New User" and follow the steps in the popup screen.
This will email the new person an invite email with a registration button. The recipient can select the button and create a password for the site. They will then be taken to the login page where they can begin interacting on the app.
Users who have been invited but not yet accepted are in the "Pending Invitations" area and selecting the red X all the way to the right will remove their invitation.
Each account can have a maximum of 10 users.
Photos
Login as an admin user
Navigate to the main admin page by selecting the “gear” symbol with the green dot located in the upper sight corner of the mail screen
This will take you to app.onebuttonconnect.com/admin
Select the “Photos” tab in the left rail.
To add a photo to the site, drag and drop photos from your device into the “Drag and Drop Photos Here" section or click in the section and browse on your device for the photos. Select them and upload.
If Default to slideshow is selected the user will automatically see the photos full screen and the images will auto-advance with the selected Display Duration.
To reorder the photos, simply use the drag and drop controller.
To add a comment on a photo, hover over the image and select the edit symbol (pencil). A text box will appear and you you can type in a description and select "save".
To remove a photo, hover over the image and select the red trashcan icon.
If you prefer not to see images in the slideshow, deselect the check box.
Videos
Login as an admin user
Navigate to the main admin page by selecting the “gear” symbol with the green dot located in the upper sight corner of the mail screen
This will take you to app.onebuttonconnect.com/admin
Select the “Content Management” tab in the left rail.
This will open the page where you can add video (Watch Content), audio (Listen) and webpage (Read) content.
To manage “watch” content, I like to open a second tab to www.youtube.com.
On YouTube, I search for a video that I want to share and then copy the link by
Copying the full URL of the video or…
Select the “Share” button and then copy the URL
Toggle back to the One Button Connect admin page and enter a title (can be any title you like) in the first text field and in the second text field, paste the YouTube URL and then select the “Add” Button.
To delete a video, select the red trashcan symbol
To edit a video, select the blue pencil
To reorder the videos, select the up and down arrows
That’s it. Repeat as necessary
Playlists
Login as an admin user
Navigate to the main admin page by selecting the “gear” symbol with the green dot located in the upper sight corner of the mail screen
This will take you to app.onebuttonconnect.com/admin
Select the “Content Management” tab in the left rail.
This will open the page where you can add music (Watch Content), audio (Listen) and webpage (Read) content.
To manage “listen” content, I like to open a second tab to www.spotify.com
On the Spotify page I search for or create a custom playlist that I want to share and then copy the link by
Copying the full URL of the playlist or…
Select the three dots (elipse) just to the right of the play button. Then select “Share” and then “copy link to playlist”
Toggle back to the One Button Connect admin page and enter a title (can be any title you like) in the first text field and in the second text field, paste the Spotify and then select the “Add” Button.
To delete a playlist, select the red trashcan symbol
To edit a playlist, select the blue pencil
To reorder the playlist, select the up and down arrows
If you have a paid Spotify account, you can enter your credentials so that the user will not hear commercials. To enter your credentials, select the "App Settings" tab in the left rail and then look in the "Communications" area. Select the "enable Spotify integration" check box, enter your credentials, scroll to the bottom of the page and select "Save Settings"
That’s it. Repeat as necessary
Medication
Login as an admin user
Navigate to the main admin page by selecting the “gear” symbol with the green dot located in the upper sight corner of the mail screen
This will take you to app.onebuttonconnect.com/admin
Select the “Medications” tab in the left rail.
This will open the Medications settings page where you can add /edit /delete medications.
To add a medication, select the “Add Medication” button which will pop up a new screen. Enter the medication name, dosage, frequency and administration times.
If the medication is taken multiple times a day, select “add time” to enter the 2nd dosage alert.
Set a start and end date for the medication and upload a photo of the meds if this may help the patient understand which med is associated with the alert.
Reminders will force a popup on the tablet and if alerts is enabled, the popup will be accompanied with an audible signal.
The user can select "Taken" of "Skipped" in the popup and these actions will be recorded in the "Recent Activity" section at the bottom of the page.
There are also buttones next to each medication to "edit" or "delete" a medication
Please Note: This is simply a supplement to other alerts that should be used to ensure medication compliance and is not a substitute for other options.
That’s it. Repeat as necessary
Events
Login as an admin user
Navigate to the main admin page by selecting the “gear” symbol with the green dot located in the upper sight corner of the mail screen
This will take you to app.onebuttonconnect.com/admin
Select the “Medications” tab in the left rail.
Select the “Calender & Events” tab in the left rail.
To create a new event, Type a title in the first text entry field, select the meeting type from the drop down list, select a date, set a beginning and end time and then add a description.
Select “Add Event”
You will now see the event in the Scheduled Events list below and it will also appear on the home page in the bottom left on the day of the event.
To see past events, select "View Archived".
To delete an archived or future event, select the trashcan symbol next to the event you wish to delete
That’s it. Repeat as necessary
Analytics
Login as an admin user
Navigate to the main admin page by selecting the “gear” symbol with the green dot located in the upper sight corner of the mail screen
This will take you to app.onebuttonconnect.com/admin
Select the “Analytics” tab in the left rail.
This will display all of the reports
Subscriptions
Login as an admin user
Navigate to the main admin page by selecting the “gear” symbol with the green dot located in the upper sight corner of the mail screen
This will take you to app.onebuttonconnect.com/admin
Select the “Subscription” tab in the left rail.
"Pause Subscription" will allow access until the end of the current subscription period.
"Cancel at Period End" will allow access until the end of the current subscription period and no more charges will occur.
"Pause Subscription" will allow access until the end of the current subscription period.
App Settings
Login as an admin user
Navigate to the main admin page by selecting the “gear” symbol with the green dot located in the upper sight corner of the mail screen
This will take you to app.onebuttonconnect.com/admin
Select the “App Settings” tab in the left rail.
You can give your application a default name (Smith Family) and set the proper time zone for the end user.
This is also where you can view your customer ID, the date you joined and when your next renewal will occur.
In Location Settings, enter the city, state/province, postal code and country of the end user. This information is used to display the local weather on the home page.
That’s it. Repeat as necessary